Creating Cute Bow-Tie Pouches with Boxy Pouch: A Beginner-Friendly Tutorial
Are you looking for a fun and creative way to upcycle old clothes while making practical storage solutions? The Boxy Pouch is the perfect project for beginners who want to explore sewing without needing advanced skills. This tutorial will guide you through creating cute bow-tie pouches using simple materials, including old jeans, and offers multiple design variations to suit your style. Whether you're a complete novice or an experienced crafter, this step-by-step guide ensures that anyone can make these adorable pouches with ease.
Why Choose the Boxy Pouch Design?
The Boxy Pouch is not just another zipper pouch; it's a unique design that combines functionality with charm. Its bow-tie closure adds a playful touch, making it ideal for storing small items like keys, coins, or even makeup. What makes this pouch special is its versatility—each version can be customized in size, lining, and fabric choice. This allows you to create a set of pouches tailored to different uses, from organizing your desk to making personalized gifts.
One of the best aspects of the Boxy Pouch is that it doesn't require any printing. All patterns are rectangular shapes that can be cut directly from fabric, which simplifies the process for those who may not have access to a printer. Additionally, the tutorial includes three detailed lessons with over 80 photos, ensuring that each step is clear and easy to follow, even for someone with no prior experience.
Lesson 1: Outer Designs Using Old Jeans
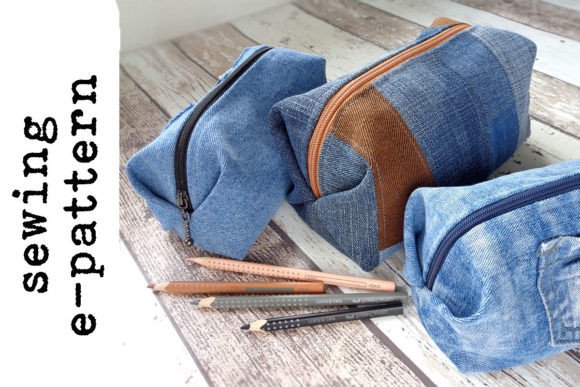
In the first lesson, we focus on creating the outer shell of the pouch using old jeans. This is not only an eco-friendly approach but also a cost-effective way to give new life to worn-out denim. There are three distinct designs to choose from, each offering a slightly different look and feel:
- Classic Denim Style: This design uses the original color and texture of the jeans, giving the pouch a rustic and timeless appearance.
- Upcycled Patchwork: For a more eclectic look, combine pieces of different denim fabrics to create a patchwork effect that stands out.
- Distressed Look: Use sandpaper or a seam ripper to create a frayed edge around the pouch, giving it a vintage, worn-in aesthetic.
Each of these designs is explained in detail with visual guides showing how to cut, sew, and finish the edges properly. The tutorial emphasizes the importance of accurate measurements and neat stitching to ensure that the final product looks professional and well-made.
Lesson 2: Lining Options for Different Needs
The second lesson explores various lining options that can be used to enhance the durability and aesthetics of the pouch. While some versions include a full lining, others offer a simpler, no-lining option that still keeps the interior tidy. Here are the three main lining choices covered in the tutorial:
- No Lining Option: This is the easiest method for beginners. By folding the fabric neatly and securing the seams, the inside remains clean without the need for additional layers.
- Basic Lining: A standard lining material such as cotton or felt is added to provide extra structure and prevent the contents from shifting inside the pouch.
- Zippered Closure Lining: Two different methods for inserting a zipper are demonstrated. One involves attaching the zipper directly to the pouch, while the other uses a hidden zipper technique that gives a seamless look.
These lining options allow you to customize the pouch based on its intended use. For example, if you're making a pouch to hold loose change, a basic lining might be sufficient, whereas a zippered closure would be better suited for keeping smaller items secure.
Lesson 3: Four Sizes for Versatile Use
The third and final lesson focuses on the four different sizes available for the Boxy Pouch. Each size serves a specific purpose, making it easier to choose the right one for your needs:
- Mini Size (4" x 6"): Perfect for holding small essentials like pens, earbuds, or jewelry.
- Small Size (6" x 8"): Ideal for storing cosmetics, hair accessories, or travel-sized toiletries.
- Medium Size (8" x 10"): Great for carrying everyday items such as phone chargers, keys, or snacks.
- Large Size (10" x 12"): Suitable for larger items like wallets, books, or even small electronics.
Each size comes with its own pattern and instructions, ensuring that the proportions are correct and the finished pouch looks balanced. The tutorial explains how to adjust the measurements if you want to create a custom size, allowing for maximum flexibility in your crafting journey.
Getting Started with Your Boxy Pouch Project
Before beginning, gather the necessary materials. You'll need a pair of old jeans, scissors, a sewing machine or needle and thread, and optional lining fabric. If you're using a zipper, make sure to select one that matches the size of your chosen pouch. The tutorial provides all the information needed to prepare these materials correctly.
Once you have everything ready, follow the step-by-step instructions in the PDF files. These files are designed to be user-friendly, with clear photographs and diagrams that guide you through each stage of the process. Even if you've never sewn before, you'll find the instructions easy to understand and follow.
Final Thoughts on the Boxy Pouch
Making a Boxy Pouch is more than just a sewing project—it's an opportunity to express creativity and repurpose everyday items in a meaningful way. With its bow-tie closure, multiple design options, and customizable sizes, this pouch is both functional and fashionable. Whether you're making one for yourself or gifting it to a friend, the Boxy Pouch is sure to bring joy and satisfaction to every stitch.
If you're ready to start crafting your own Boxy Pouch, download the three detailed lessons today. You'll receive instant access to the PDF files, which contain everything you need to create four beautiful pouches with ease. With over 80 photos and step-by-step guidance, this tutorial is the perfect resource for anyone looking to explore the world of sewing in a fun and accessible way.